使用cargo-generate创建模版
首先安装cargo-generate
cargo install cargo-generate生成一个项目
cargo generate --git https://github.com/knurling-rs/app-template Project Name: app
Creating project called `app`...
Done! New project created /tmp/appcd app配置文件
第一步在 .cargo/config.toml 中设置一个默认的编译目标。
# Pick ONE of these compilation targets
# target = "thumbv6m-none-eabi"    # Cortex-M0 and Cortex-M0+
# target = "thumbv7m-none-eabi"    # Cortex-M3
# target = "thumbv7em-none-eabi"   # Cortex-M4 and Cortex-M7 (no FPU)
target = "thumbv7em-none-eabihf" # Cortex-M4F and Cortex-M7F (with FPU)
第二步是将内存区域信息输入到 memory.x 文件中。
/* Linker script for the STM32F303VCT6 */
MEMORY
{
  /* NOTE 1 K = 1 KiBi = 1024 bytes */
  FLASH : ORIGIN = 0x08000000, LENGTH = 256K
  RAM : ORIGIN = 0x20000000, LENGTH = 40K
}
注意:如果你在首次
build特定构建目标后,出于某种原因更改了memory.x文件,那么在执行cargo build之前要先执行cargo clean,因为cargo build可能无法及时跟踪memory.x的更新。
在 bin/hello.rs 中检查内
与原文差异原因
| 宏 | 说明 |
|---|---|
hprintln | 旧版 cortex-m 的打印宏,新版本已移除 |
| defmt::println | 新版推荐使用的打印宏(通过 RTT 输出) |
你的 Cargo.toml 已经包含 defmt-rtt,所以使用 defmt::println 是正确选择。
#![no_main]
#![no_std]

use app as _; // global logger + panicking-behavior + memory layout
use cortex_m_rt::entry;

#[entry]
fn main() -> ! {
    defmt::println!("Hello, world!");

    loop {}
}
Memory Mapped Registers 内存映射寄存器
内存映射寄存器(MMIO):把硬件设备“抽象成内存”,让 CPU 用普通的读写指令就能控制外设及通过“对特定地址的读写”来进行控制。
┌──────────────────────────────┐
│ 应用层 (App) │
│ main.rs / 业务逻辑 / RTOS │
└────────────▲─────────────────┘
│ 调用 API
┌────────────┴─────────────────┐
│ HAL 层 (硬件抽象) │
│ stm32f3xx-hal │
│ GPIO / UART / SPI / I2C │
└────────────▲─────────────────┘
│ 调用寄存器
┌────────────┴─────────────────┐
│ PAC 层 (寄存器映射) │
│ stm32f3 (svd2rust 生成) │
│ RCC / GPIOx / USARTx │
└────────────▲─────────────────┘
│ CPU控制 / 指令
┌────────────┴─────────────────┐
│ Micro-architecture 层 │
│ cortex-m / cortex-m-rt │
│ NVIC / SCB / asm / 启动逻辑 │
└────────────▲─────────────────┘
│
┌────────────┴─────────────────┐
│ 硬件层 (MCU) │
│ Cortex-M4 + Flash + RAM │
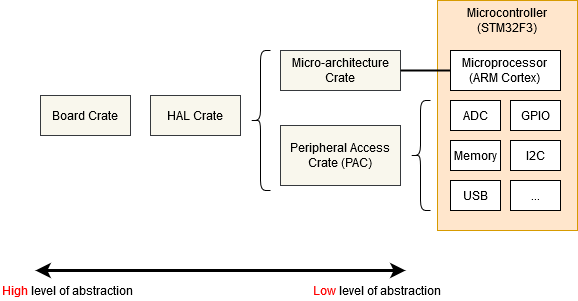
└──────────────────────────────┘Micro-architecture crate(CPU 层)
是底层对CPU的低级访问,是关于CPU基础行为定义
cortex-m crate
cortex-m-rt crate
Peripheral Access Crate (PAC)
地址 + 偏移 的类型安全封装
stm32f3 crate
HAL Crate
把对寄存器直接的操作抽象成为易于理解的API
stm32f3xx-hal crate
例子
let led = gpioa.pa5.into_push_pull_output();
led.set_high();
Board Crate
比 HAL Crate 更进一步,通过预先配置各种外设和 GPIO 引脚以适应你使用的特定开发者套件或板,例如用于 STM32F3DISCOVERY 板的 stm32f3-discovery。
Semihosting半主机模式
个人感觉不实用可以用defmt 代替
Panicking
是Rust语言的核心,是内置在operation或index中的用来保证内存安全,当尝试越界时回返回panic。
当 panic 发生时,Rust 会回溯当前线程的调用栈(逐层退出函数并执行清理),除非你选择让程序在 panic 时直接终止(abort)。
因为嵌入式系统的需求差异很大(从可以崩溃到绝不能崩溃),所以 panic 的处理方式没有统一标准,但常见策略(停机、打印、重启等)已经被封装成 crate在#[panic_handler],你只需要选择合适的 panic handler 即可。
panic-abort. 一个panic会导致执行中止指令直接停止。
panic-halt. 一个panic会导致程序或当前线程通过进入无限循环而停止。
panic-probe.panic信息通过RTT(内存通道)进行输出日志记录。
panic-itm.panic信息通过 ITM(ARM Cortex-M 特定外设)进行记录。
panic-semihosting.painc信息通过semihosting技术记录到主机上。
你可以在 crates.io 上搜索 panic-handler 关键词,或许能找到更多 crate。
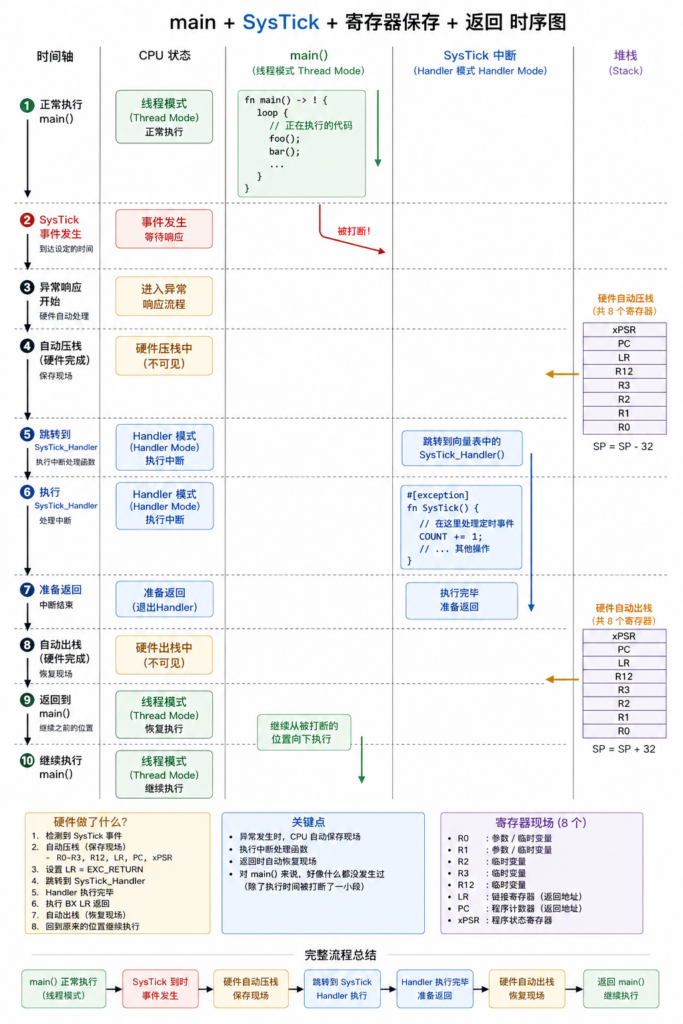
Exceptions不想看了
异常和中断是处理器提供的一种硬件机制,用来处理异步事件(比如外设中断)和致命错误(比如非法指令)。当这些事件发生时,CPU 会抢占当前执行流程,跳转到对应的异常处理函数(handler)来处理。
发表回复